Create and Execute Preventative Maintenance
Objective: Gain an understanding of how to Create and Execute Preventative Maintenance for Assets.
Preventative Maintenance Process
Preventative Maintenance is maintenance that is performed on assets at regular intervals of time to lessen the likelihood of failure.
Create a Preventative Maintenance Plan
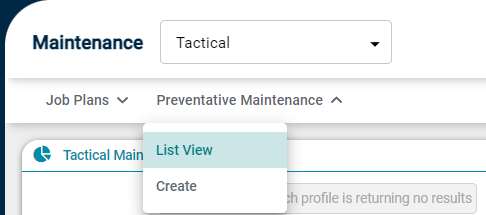
From the Navigation Sidebar, select Maintenance and select 'Tactical' from the Navigation Dropdown or simply click the Tactical tile on the Maintenance Dashboard.

Select 'Create' within the Preventative Maintenance drop-down:

The following page will be displayed:
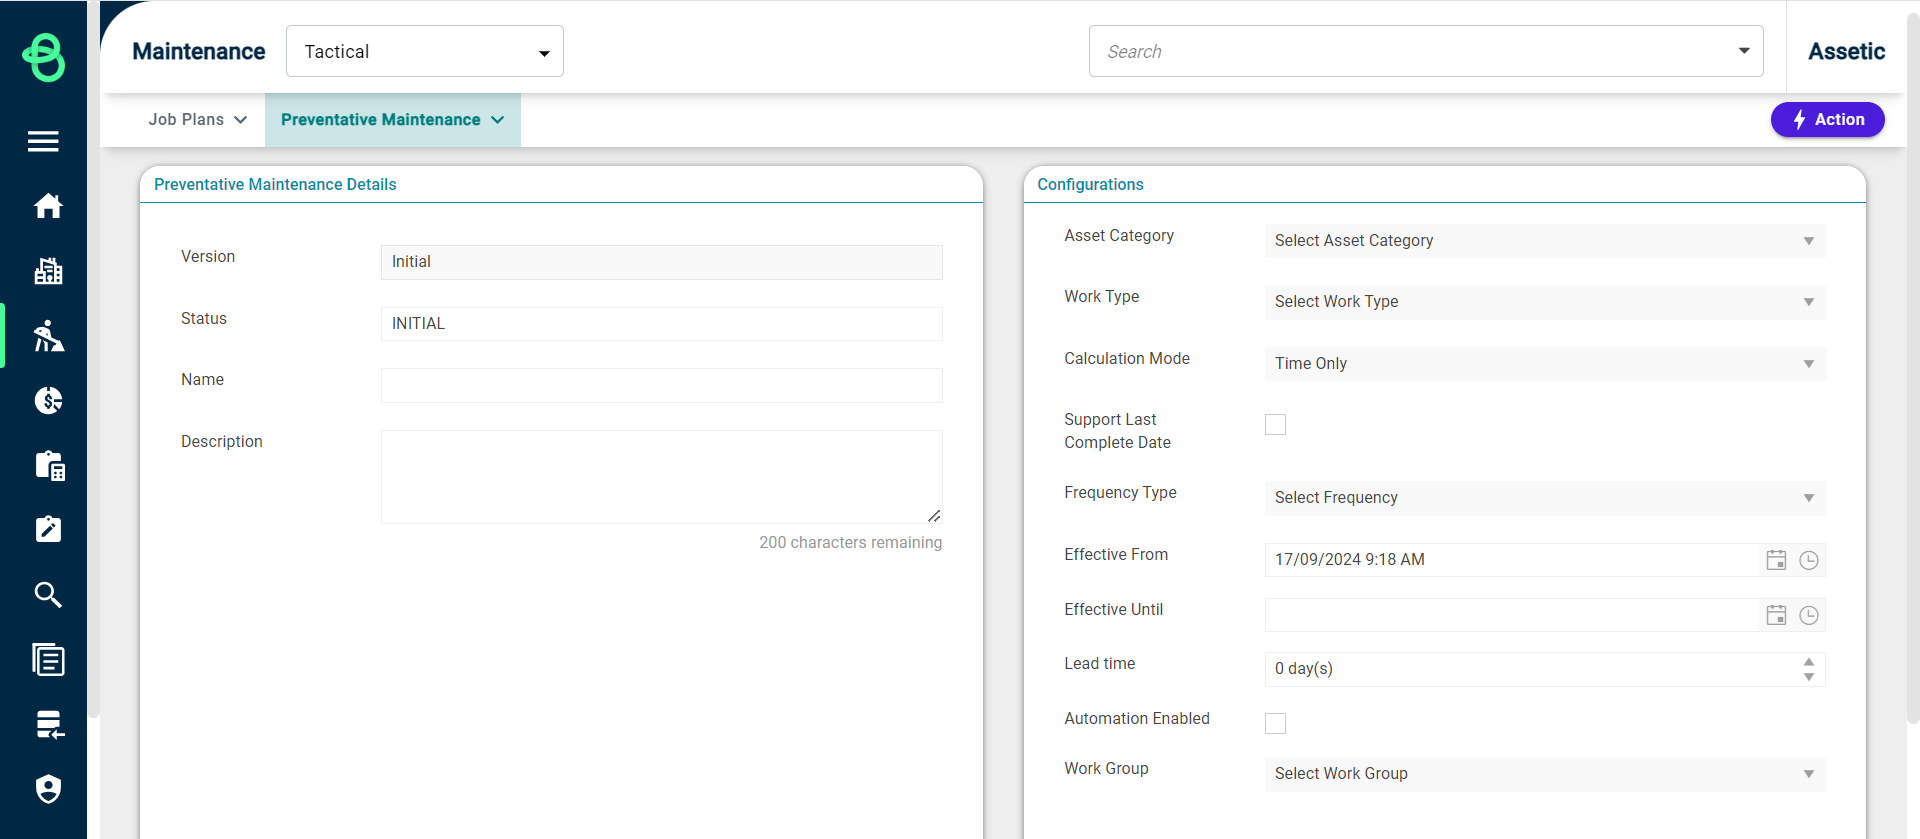
The initial screen for creating a preventative maintenance plan has mandatory fields that need to be entered.
-
Version: An automatically generated field, that indicates the current version.
-
Status: An automatically generated field, that indicates the current status.
-
Name: Enter the name of the preventative maintenance work.
-
Description: Enter a description of the preventative maintenance work.
-
Asset Category: An optional drop-down selection, where users can select a single Asset Category. If a Category is chosen, then all Job Plans and Assets added to the PM must belong to the selected Category. If the drop-down is left unselected then Job Plans and Assets from any number of different Categories can be used in the PM, allowing for the creation of PM programs which cover multiple different Asset Categories at once, with the Job Plans being used for WO creation even if they do not match the Asset's Asset Category.
-
Work Type: A drop-down list that displays all work types including PM, CM, MD and PJ work as described in the Brightly Assetic framework.
-
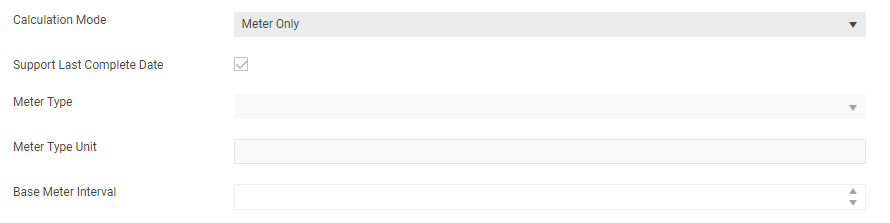
Calculation Mode: A drop-down field that allows the users to select an option between 'Time only', 'Meter Only', and 'Time and Meter'. Selecting 'Meter Only' or 'Time and Meter' allows for the Execution Plan and 'Last Schedule Date' to be set for individual Assets, and displays additional configuration fields as shown below:
-
Meter Type: a drop-down field to select an available Meter type.
-
Meter Type Unit: a text field to enter the meter type unit.
-
Base Meter Interval: a numeric stepper to enter a number.
-
Support Last Complete Date: a check-box to indicate if the next work order run is set periodically each month or when the current work order is complete to generate the next run date. Example: if the option is enabled, the task will be created on the 1st of the month with no option to generate further work orders until the current work order is complete (COMP status). If not enabled, then the work order will generate every month periodically (1st of the month of every month, regardless of when the task is carried out).
-
Frequency Type: A drop-down list that displays the frequency measure that the PM plan will be measured from, i.e: day, week, month, year.
-
Effective From: A date field that indicates when the PM will be effective from (not the first execution date). Note: the actual creation of a Work Order can occur prior to the 'effective from' date in order to meet Lead Time requirements.
-
Effective Until: A date field that indicates when the PM will be effective until.
-
Lead Time: A numeric field to specify an amount of time in days, so that work orders are generated that far in advance of their scheduled date.
-
Automation Enabled: A checkbox which when checked means that the PM will be automatically run daily, at 9:00 am UTC. Note that a PM plan must have a Lead Time greater than 0 or have Support Last Complete enabled in order to automatically generate Work Orders.
-
Work Group: An optional dropdown to select any of the available Work Groups for the Preventative Maintenance program. If populated, the selected Work Group will be used when adding Assets and during Work Order generation.
Actions
Selecting the Actions button in the upper right corner will display the following screen:

Select 'Save (Save as Draft)' to save the Preventative Maintenance plan and move to the configuration and asset assignment screen as seen below.
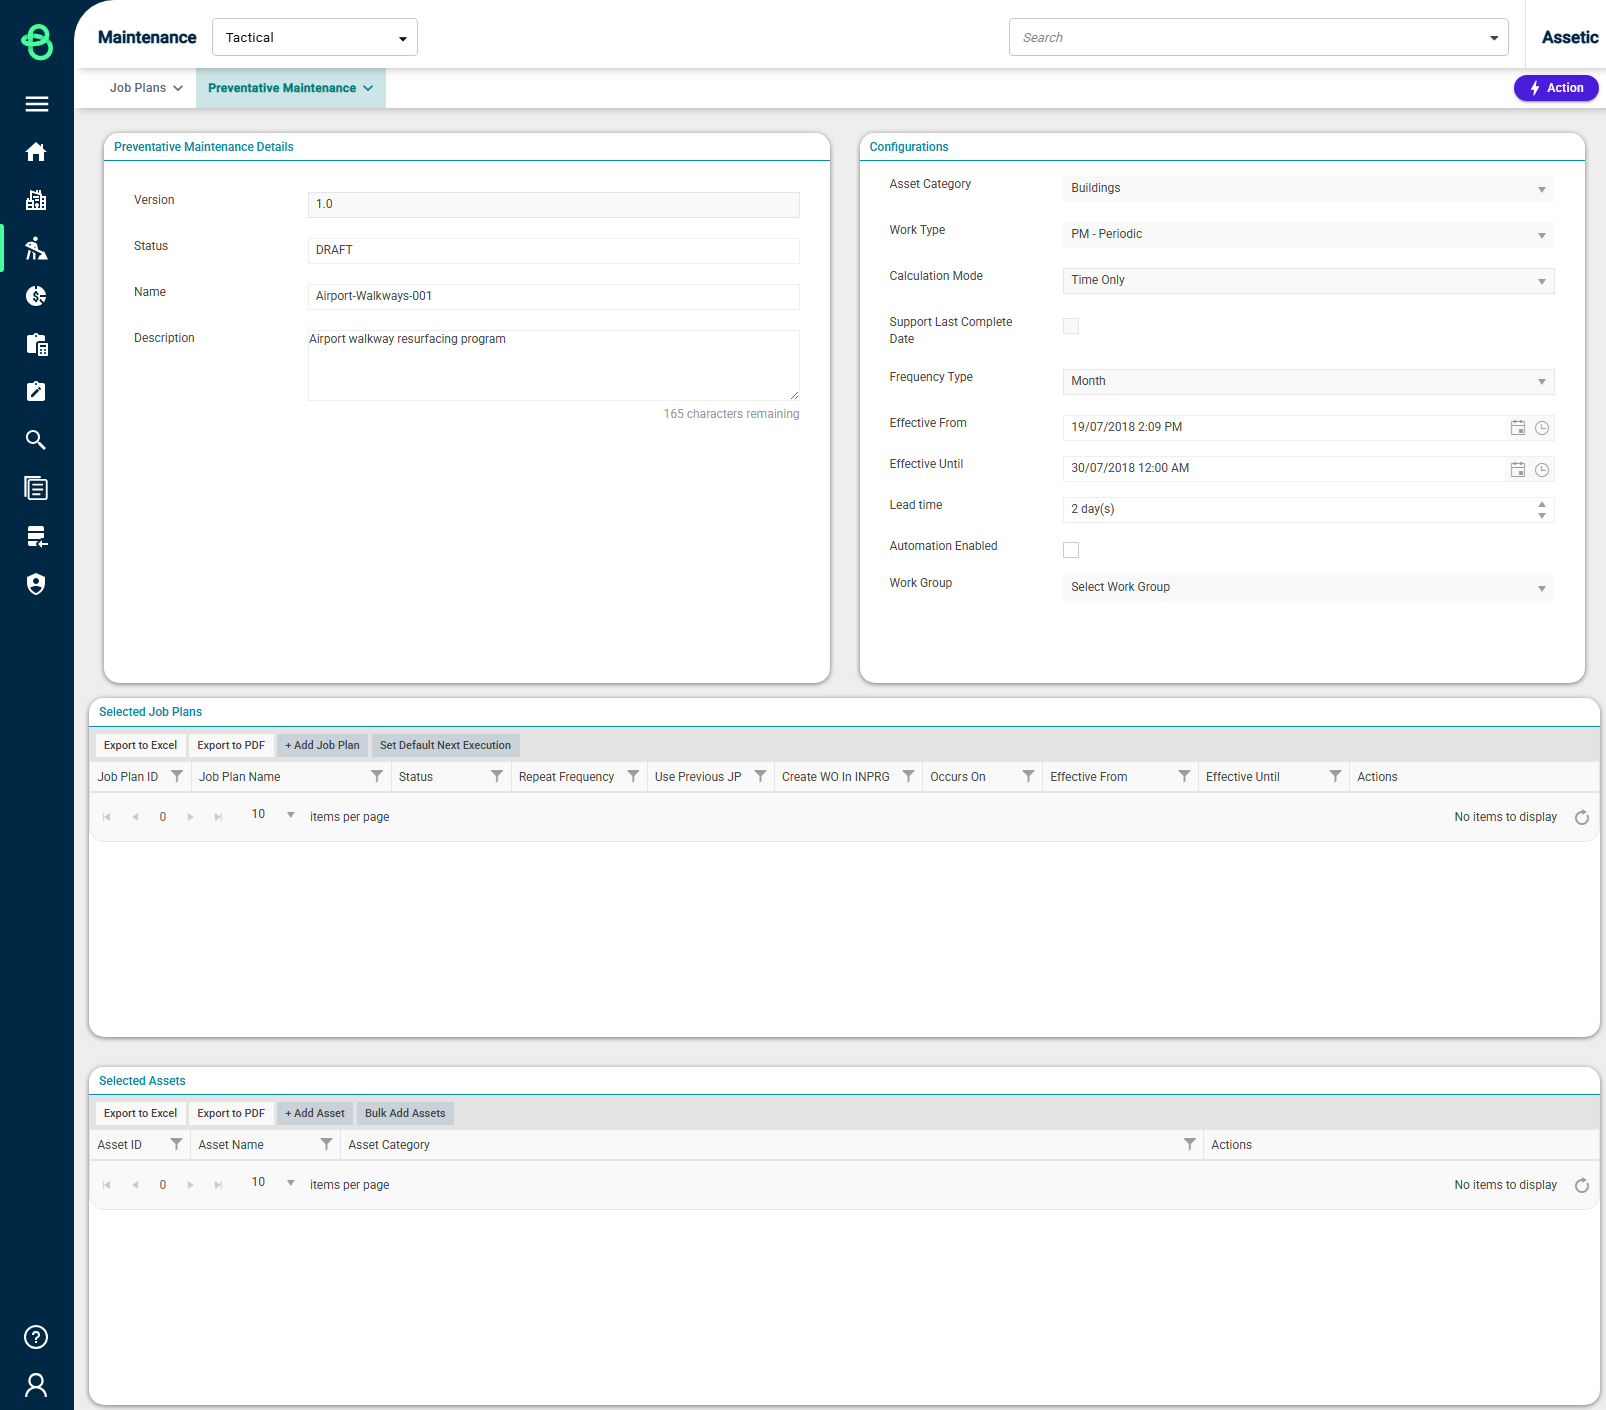
The 'Selected Job Plans' section includes all applicable job plans associated with the assets selected for the Preventative Maintenance plan.

To add a Job plan to the tab, select the 'Add Job Plan' button. This will produce the following screen.
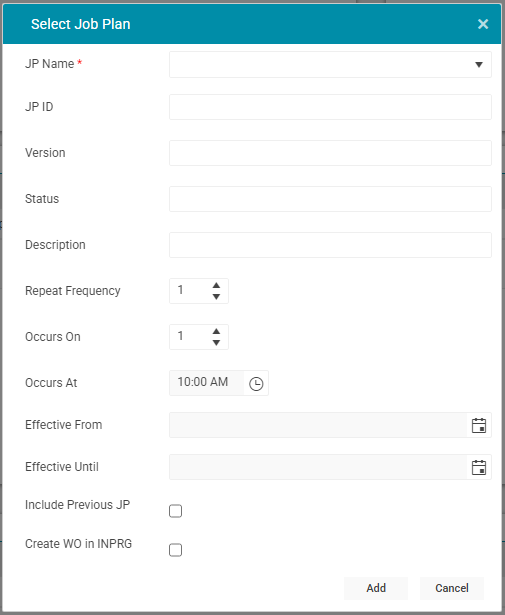
To apply a job plan, select from the applicable job plans from the 'JP Name' drop-down list. This list will be automatically populated with job plans associated with the asset category selected. Once selected, the JP ID, Version, Status, and Description fields will be populated.
-
Repeat Frequency: This allows the user to select a call count that multiplies by the 'Frequency Type' set at the PM level. I.e: if 'month' was selected and repeat frequency is 3, then this JP will be expected to be generated every three months.
-
Occurs On: The interval within the frequency type of which this JP will be planned to generate. I.e: If 'month' is selected and the field entered is '7', then every 7th day of the month, the JP will be generated. (This field will only be available if the 'Support Last Complete Date' option is not selected.)
-
Occurs At: A field to select what time of day the JP will be generated. (This field will only be available if the 'Support Last Complete Date' option is not selected.)
-
Effective From: A date field that indicates when the JP will be effective from (not the first execution date).
-
Effective Until: A date field that indicates when the JP will be effective until.
-
Include Previous JP: This is a checkbox that, if ticked, means that when a job plan is activated monthly, that when the yearly event is activated, it will also activate the monthly job plan. If this box is not ticked then the lower interval job plan is suppressed.
-
Create WO in INPRG: This checkbox, if ticked, will create the Work Order in the INPRG status when possible. For this to be possible, all the Job Plans used in the Work Order's creation must have a default Resource configured at the Job Plan level, and the Resource assigned must belong to the Work Order's Work Group. If it is not possible, the Work Order will generate in the APPR status.
Click 'Add' when this job plan is to be applied.
NOTE When a user creates a PM the repeat frequency, 'Occurs On' and 'Effective From' are very important to understand. For example, in a situation where a PM with a monthly frequency is Effective From 1/1/2017, and the Occurs On is 7 with a repeat frequency of 1, it will generate a work order on the 7/1/17. However, if the effective from date were instead 10/1/2017 and the other variables the same, the first generated work order would be the 7/2/2017.
Next Default Execution
After a Preventative Maintenance plan has been created, there is additional functionality within the selected job plan function that allows for the 'next execution' of the plan to be modified.
Select the 'Set Default Next Execution' button to open a pop-up screen that displays when the next job plan will be called and at what date based on the current count.
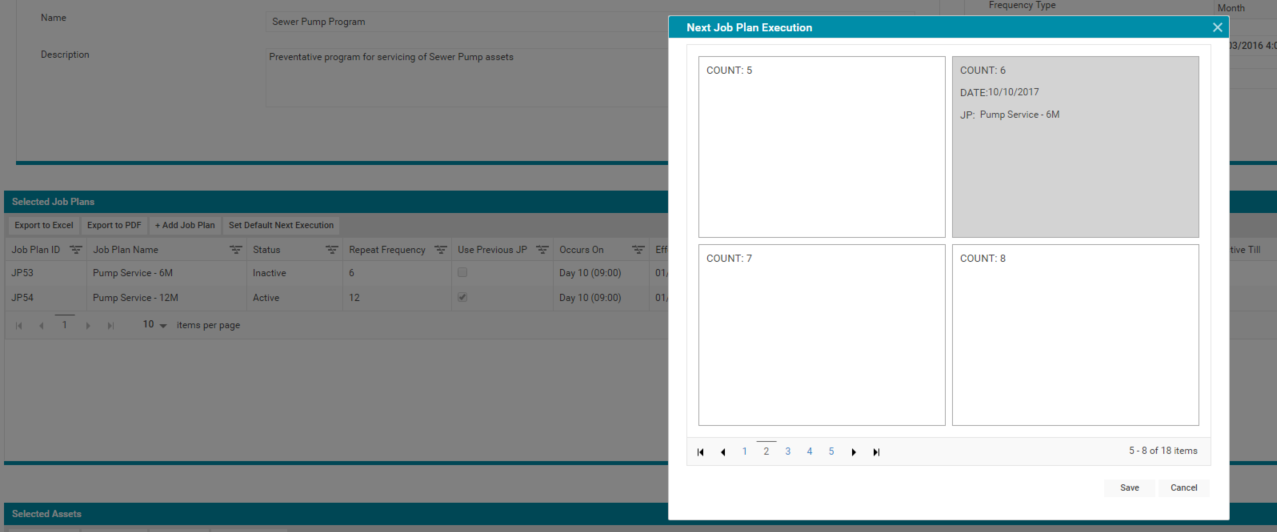
In the example above, it shows that at count 6, the job plan for the 6-month service will be produced for the 10/10/2017. Selecting a different variation of the count will have an impact on the execution date of this job plan.
The maximum count that the Next Job Plan Execution window will project is 5 more than the lowest common multiple of all the Job Plan's frequencies. So, in the above example with repeat frequencies of 6 and 12, the count will project 17 times.
All fields in the 'Selected Job Plans' section are populated by the 'Add Job Plan' button.
Within the Selected Job Plans area, there is the ability to Edit, Delete, or View the job plan.

The Selected Assets section lists all assets that this preventative maintenance plan applies to.
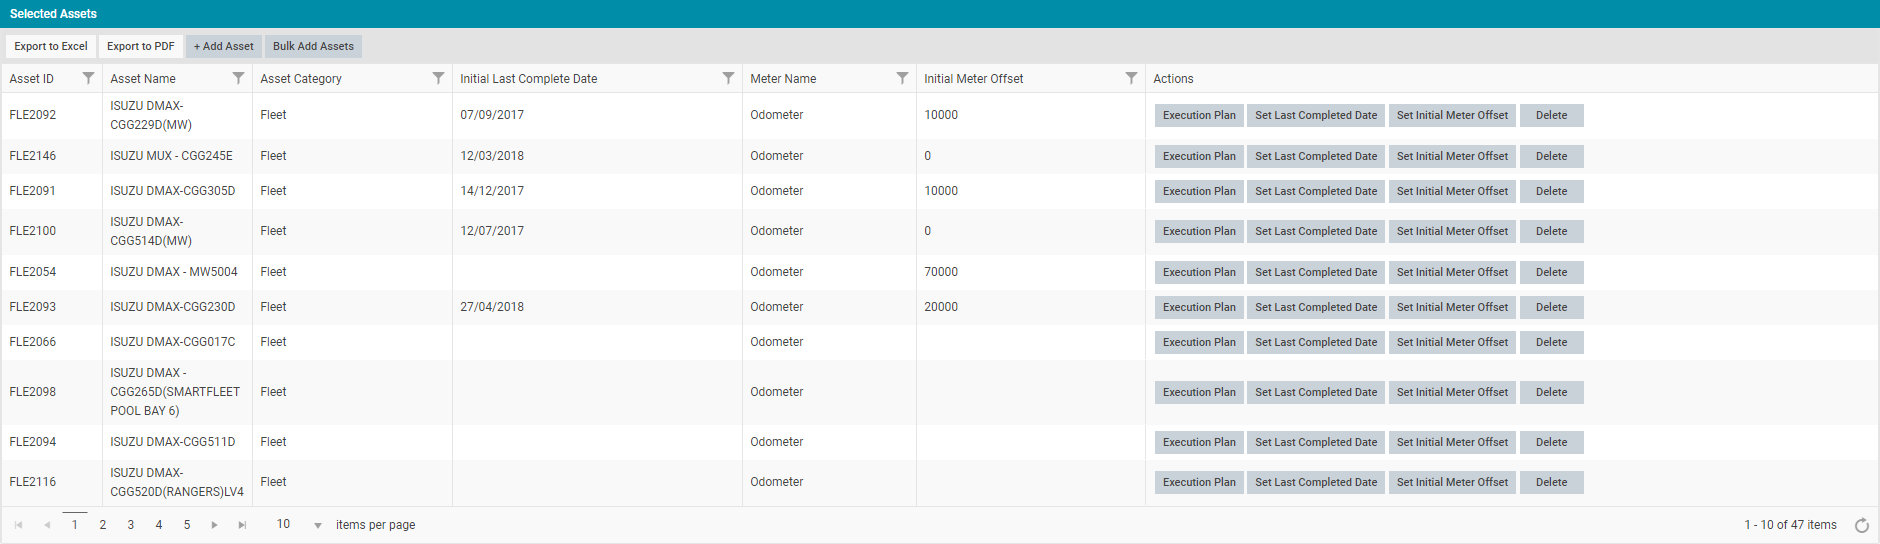
If the Preventative Maintenance plan has been configured with a 'Calculation Mode' of 'Time and Meter' or 'Meter Only', then the 'Execution Plan', 'Set Last Completed Date', and 'Set Initial Meter Offset' buttons are available in the Selected Assets grid, allowing for these to be set for each Asset individually.
It is also possible to generate Preventative Maintenance executions based on the last completion date.
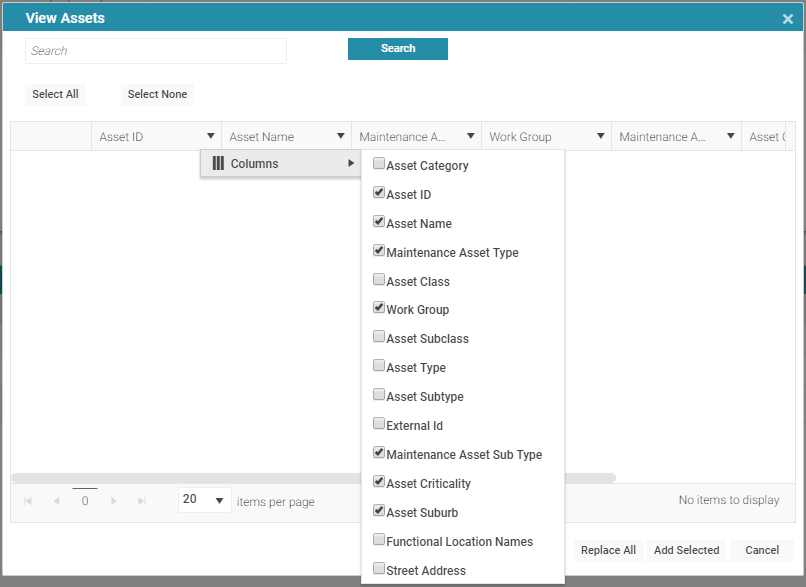
To add assets click the 'Add Asset' button. Then the following window pops-up.
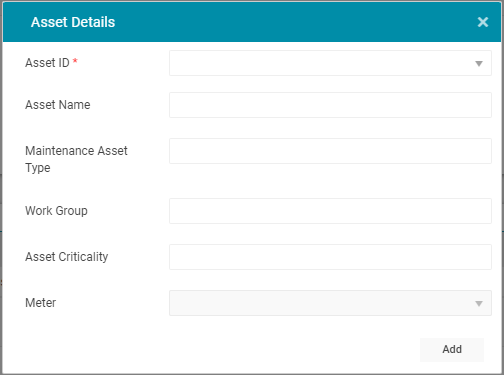
The user can either select the Asset from the drop-down, or search using the 'Asset ID' to include the asset in this preventative maintenance plan. Doing so will automatically populate the additional fields. Select 'Add' to complete this process.
Additional information will now be populated in the 'Selected Assets' tab.
Selecting the 'Bulk Add Asset' produces the following view:
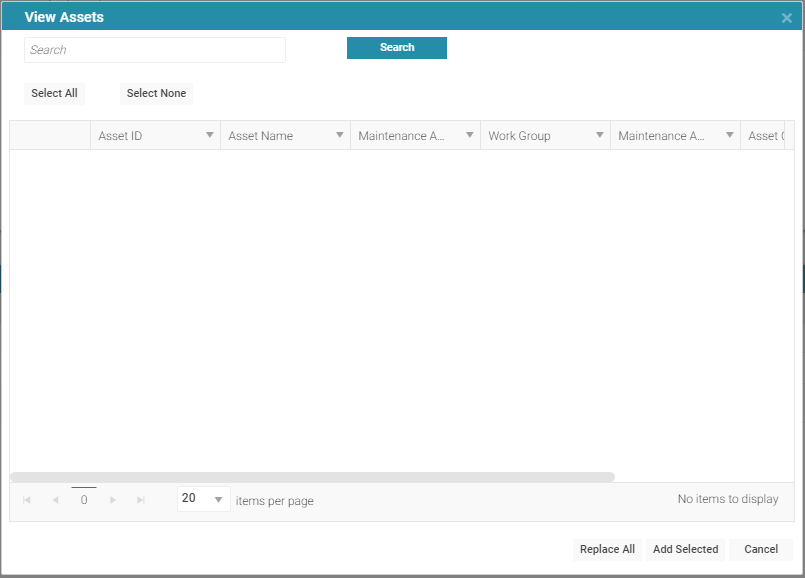
It is possible to search on the following fields:
-
Asset Category
-
Asset Class
-
Asset Subclass
-
Asset Type
-
Asset Subtype
-
External ID
-
Functional Location Names
-
Street Address
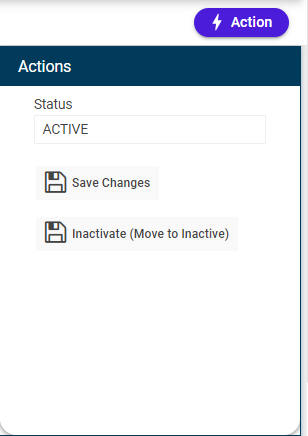
Once the Job Plans and Assets are selected, select the actions button.
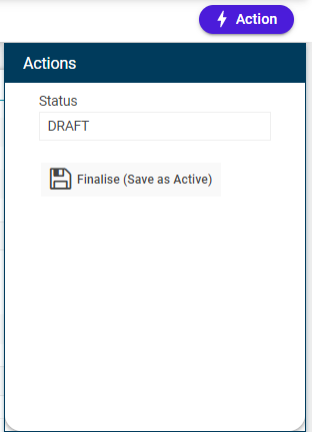
The 'Actions' panel displays the following button that enables the user to move the preventative maintenance plan to the 'Active' status.
-
Finalise (Save as Active): Click this button to activate the preventative maintenance plan.
Execute Preventative Maintenance
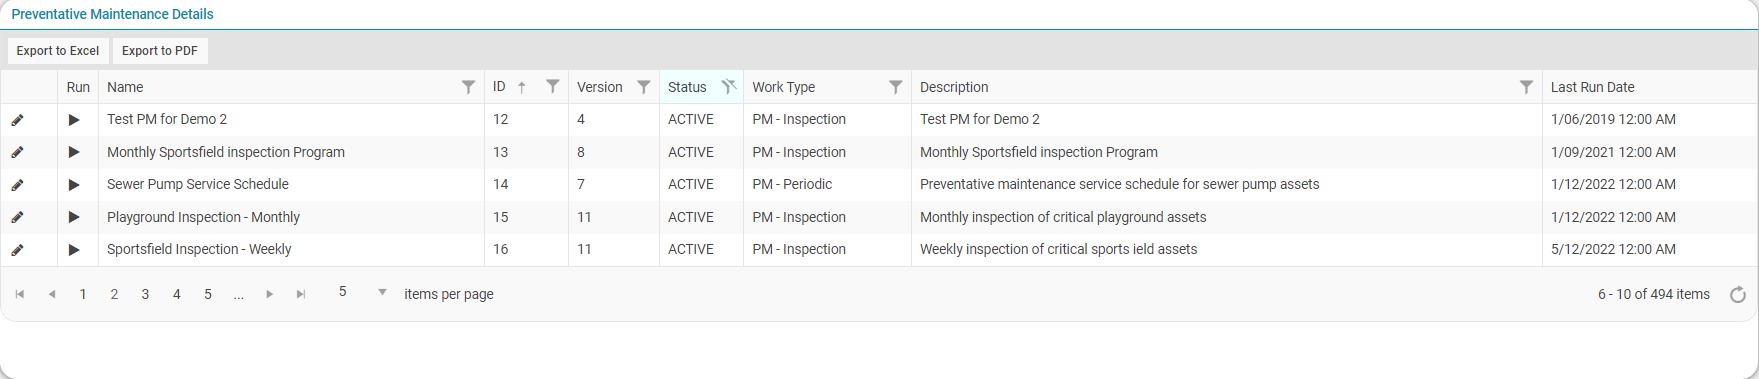
To Execute PM, select 'List View' from the Preventative Maintenance drop-down.
From the 'Preventative Maintenance Details' box, select the Execute button ( ) next to the PM in order to execute it.
This will open the Run Preventative Maintenance pop-up:
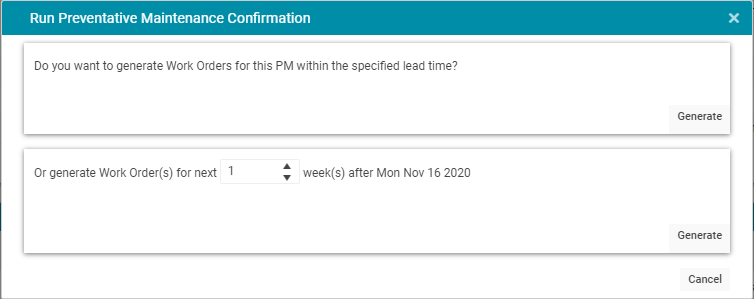
The PM can be executed using the lead time specified by its configuration, or a value can be entered in the field available to generate work orders for the next day(s)/week(s)/month(s)/year(s). Click Generate to execute the PM successfully.
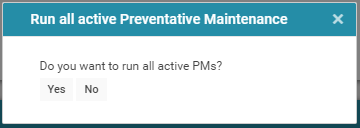
To execute all PM plans with a status of 'Active', select the button 'Run All Active PMs'.

A confirmation message box will display before the action is committed.
The progress of the process will be then displayed in the 'Running Tasks' section.
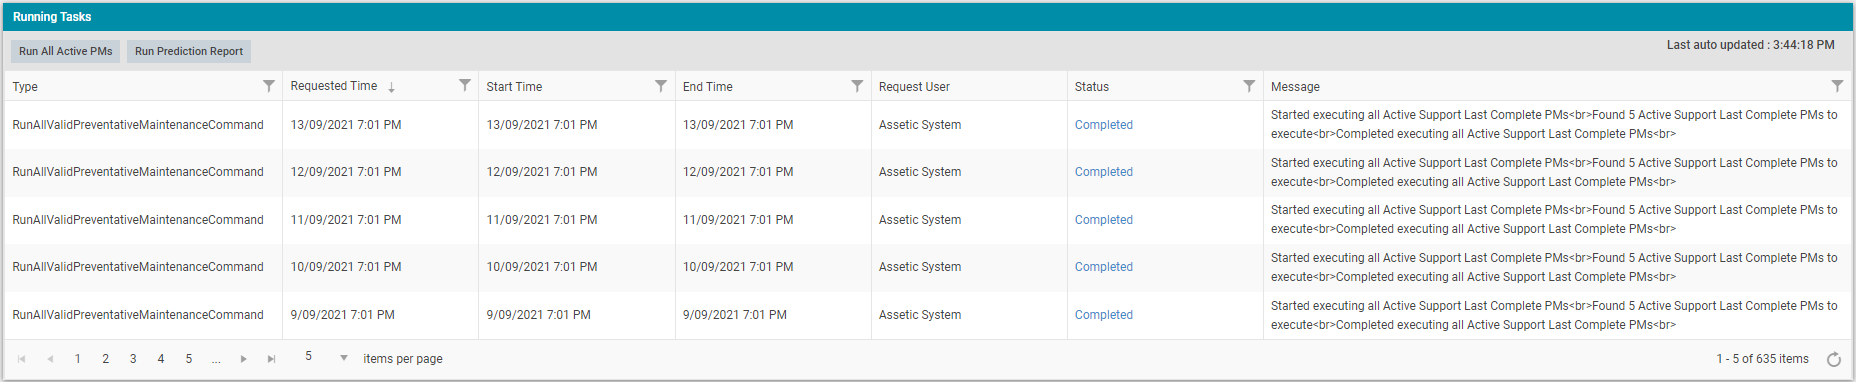
When the task has been completed a results summary can also be downloaded using the hyperlink contained within the 'Status' column, which will state 'Completed', 'Completed with Error', or 'Error' if there were any issues with the task. 'Completed with Error' can appear for one of the following reasons:
-
An inactive Asset is linked to the Preventive Maintenance program.
-
The PM had Resources set but there were not able to be assigned successfully to the generated Work Order.
-
Labour Craft is not configured with the appropriate Work Group.
-
An inactive Resource was found for the configured Craft.
-
Meter Usage Per Day for one or more Assets in the PM is 0 (or lower).
Execute Prediction Report
An initial version of the Preventative Maintenance Prediction Report can be generated. Improvements to this report are planned for future release.
Running this report will simulate the 'Run All Active PMs' function, and produce an excel spreadsheet with the Work Orders that would have been generated.
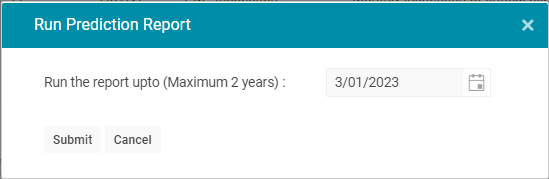
To run a Prediction Report for all 'Active' Preventative Maintenance Plans, select the button 'Run Prediction Report'.

This will open a pop-up and the user will be asked to select a date for the report to run up to. The date selected will have a maximum of a 2-year buffer.
While running, users can check on the progress.
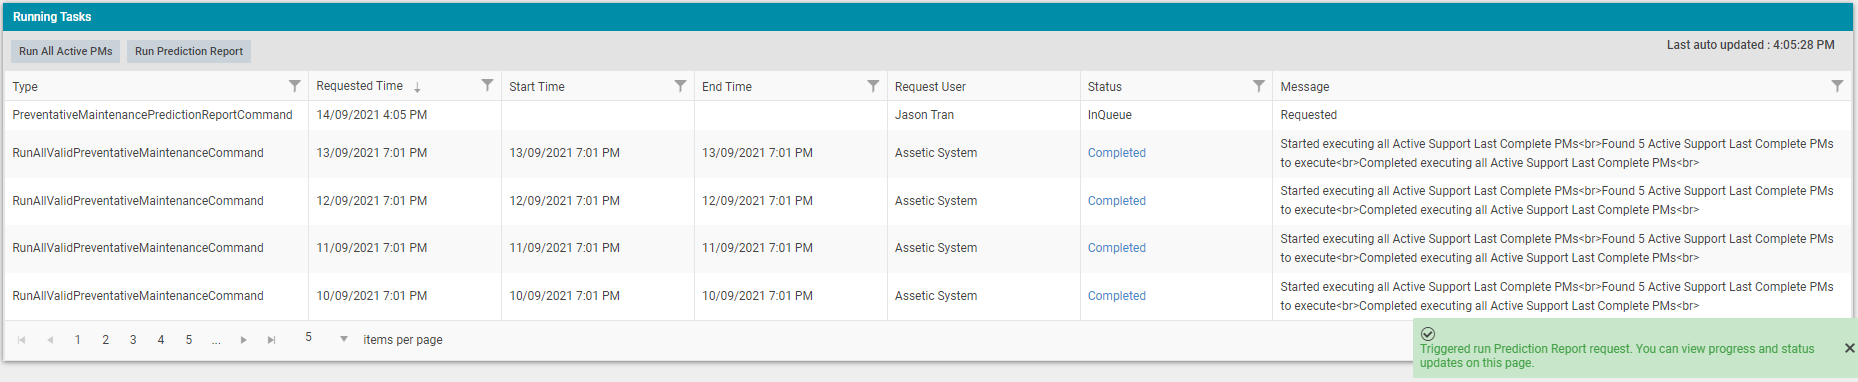
Once completed, select the 'Completed' hyperlink to download the file.

Disable Preventative Maintenance
To disable a Preventative Maintenance plan, click on the edit button next to the PM in the Preventative Maintenance Details list.
Then select the 'Actions' panel and then click on the 'Inactivate' button.
This will disable the current 'Active' PM and set the status to an 'Inactive' state until it is manually activated again.
NOTE When cancelling a Work Order that was generated by Preventative Maintenance, the PM will generate the next Work Order for the next execution count, effectively allowing for Work Orders to be skipped.
